

You can have the fanciest camera in the world, but if your lighting sucks, your photos will too. Lighting equipment makes all the difference. It helps you manage shadows, pull out the details, and set the mood just right. If you're starting out or you're thinking about leveling up your setup, getting to grips with lighting basics will instantly boost your photography game.
This guide keeps it simple and walks you through building a pro photo setup with some helpful tips, one step at a time.
Lighting is basically the backbone of every good photo. Even expensive cameras can’t save a shot with bad lighting—your pictures end up flat or fuzzy. But solid lights? They make simple setups look polished, and they help you control brightness, direction, and color. Plus, you’re not stuck waiting for natural light to cooperate.
That’s why photographers put money into dependable lighting gear: it helps them get consistent results every time.
Before you buy anything, it helps to know your options. Different studio lights do different jobs.
Knowing what's out there helps you pick the right lights for your style.
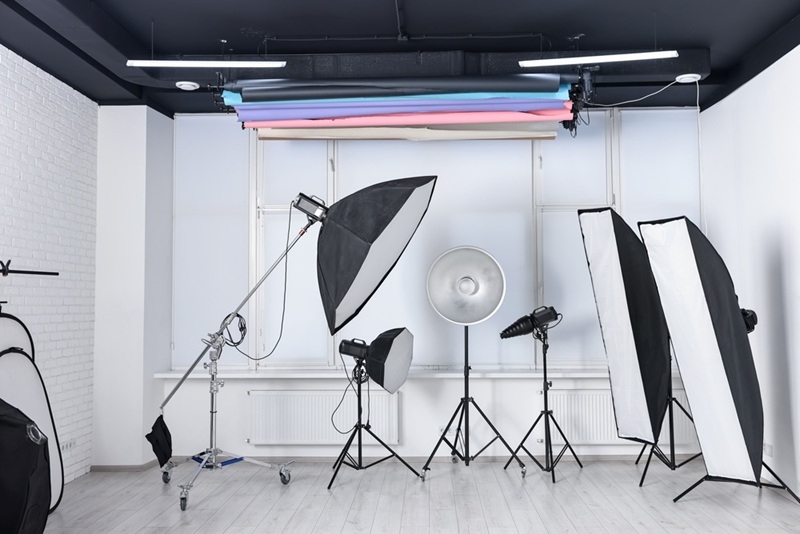
Nobody likes harsh, weird shadows in their photos. Softbox lighting fixes that. It spreads the light nicely and evenly, so everything looks smoother and more natural. Photographers use softboxes for portraits, products, and videos—it just makes people and things look better.
Softboxes come in all shapes—rectangles, squares, octagons—each gives you a slightly different vibe. Octagon softboxes, for example, create nice, round reflections in the eyes, which feels more lifelike.
If you’re serious about your setup, a softbox is worth adding to your bag.
LEDs have taken over lately, and honestly, it’s easy to see why. They're light, portable, and don’t turn your studio into a sauna. You can tweak the brightness and color temperature, so you get the exact look you want—warmer, cooler, whatever fits.
Most lighting kits now include LEDs, and they’re perfect if you’re working in a small space or just starting out. If you want something that’s versatile and easy to use, LED lights are a smart investment for your photo setup.
If you aren’t sure where to start with lighting, kits really take out the guesswork. Most of them come packed with all the basics you need straight away. A typical kit includes some studio lights, stands, softboxes, and often reflectors. Upgrade to a fancier set, and you might get LED lights, umbrellas, or even background supports thrown in.
Buying a kit is simpler and usually cheaper than picking everything out one by one. Plus, all the gear is designed to play nicely together.
So, if you’re just starting and want professional results, lighting kits are hands-down the easiest way in.
You don’t have to go all in from day one. Start small—pick up the essentials, get a feel for them, and build from there. At the core, you’ll want one or two studio lights, a softbox, and a reflector. Even this basic setup covers portraits, product shots, and simple creative work.
Reflectors are pretty handy—they bounce light back, fill in shadows, and give your subject a softer look. You’ll also want some solid tripods or light stands for stability and better control.
As you get more comfortable, you can add extras like a background light or something to add a pop of light to hair and clothes.
You don’t need a massive studio to get pro-looking photos. A little planning goes a long way, even in your living room.
First, find a spot with enough elbow room for your lights and your subject. Get your main light set up about 45 degrees from the subject; that almost always gives you a natural effect. Throw in a second light or a simple reflector on the other side to dial back those shadows.
If you’re rocking a softbox, raise it just above your subject’s eye level and tilt it down. That’ll give you soft, even light that flatters almost anyone. LED lights are awesome for adding a dash of fill or lighting up the background. Play around—move things, try new angles, and see what clicks for your style.
As you shoot more and find your groove, start adding to your setup bit by bit. Pick up extra studio lights for more control. You could experiment with new light modifiers, such as beauty dishes, and/or upgrade from traditional fluorescent bulbs to LED’s for better color-matching and consistency when shooting subjects.
If you have multiple sources of light to choose from, then it will become easier for you to create more difficult and interesting lighting setups. The more light sources you have, the greater your options for creativity.
When considering whether to upgrade your current lighting equipment, base your decision on whether you truly need new equipment as opposed to merely purchasing what everybody else is buying.
Getting set up for pro-level photos doesn’t need to be a big hassle. The right lighting gear can lift your work and bring your creative ideas to life.
Your skills and your setup will grow together. With some smart choices, you can turn even a tiny home studio into a place for serious, professional-looking shots.
The easiest way for a beginner to experiment with lighting in photography is to get a small kit that includes LED lights, a softbox, and a reflector. These gadgets are simple to operate, cheap, and also very helpful if you want to understand how to work with light in a basic way without having too complicated a photo setup that might scare you off.
One light should be your main source of illumination, while the second one - the fill or the background light - is there just to soften shadows and bring a little bit of the third dimension to your photos.
Lighting kits are usually the better option for beginners, first of all, because they contain all the necessary pieces, such as the lights, stands, and modifiers. Besides, they are more time-efficient as you will not be looking for individual pieces. Finally, they generally present a better price than buying items separately.
Of course, LED lights are already a staple in professional photography. Their main features are adjustable brightness, low heat, and energy efficiency. Along with good lighting or positioning, LEDs can produce excellent results that are also good for a variety of photography genres.
This content was created by AI